How to Photograph the Andromeda Galaxy with a Small Telescope
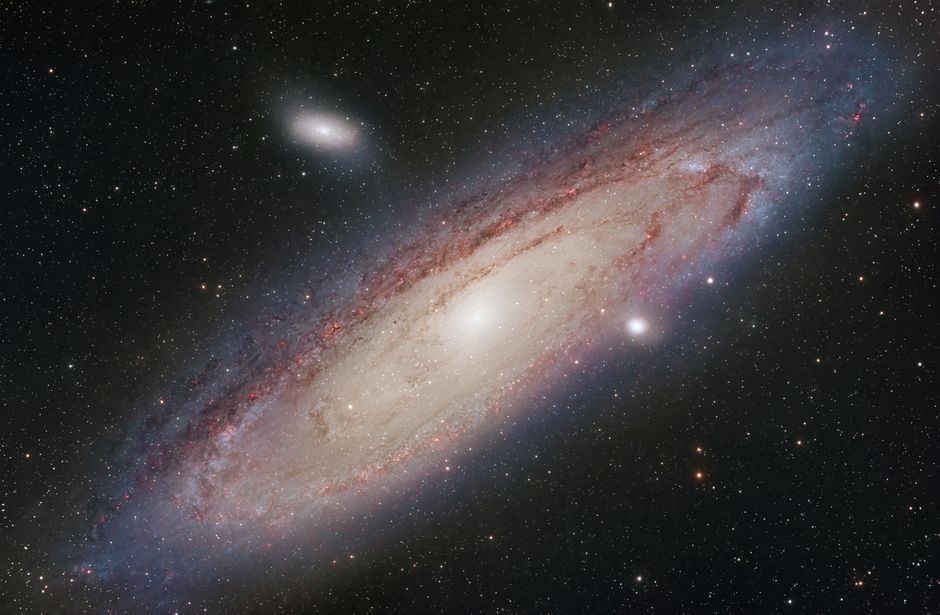
The Andromeda Galaxy, catalogued as M31, is one of the most rewarding objects in the night sky for amateur astrophotographers. Its large apparent size and relatively high surface brightness make it an achievable target even with small telescopes and modest camera equipment. While professional observatories produce breathtaking detail, a well-planned session with a 70–100 mm refractor or a 6-inch Schmidt-Cassegrain can yield images that reveal the galaxy’s spiral structure, dust lanes, and bright core.
This article describes a structured approach to capturing and processing images of M31. Rather than focusing on specific outcomes, it outlines the methods, settings, and considerations that can help practitioners obtain usable data. Exposure settings, calibration frames, and post-processing techniques are covered with an emphasis on repeatability and transparency. Equipment choices vary widely, so the principles explained here can be adapted to different telescope and camera combinations.
Before beginning, it is important to recognise that results depend on many factors: sky conditions, mount accuracy, camera sensor characteristics, and the amount of integration time. The information provided is intended as a reference framework, not a guaranteed recipe. With careful planning and incremental refinement, consistent progress is possible.
Understanding Your Equipment and Its Capabilities
Small telescopes commonly used for deep‑sky imaging include short‑focal‑length refractors (e.g., 400–600 mm focal length) and compact catadioptric designs. Their portability and simpler collimation requirements make them attractive for beginners. However, the choice of mount is equally important: a stable equatorial mount with accurate tracking capability is essential to keep the galaxy centred during long exposures. Without reliable guiding, even a short exposure of 30 seconds may show trailing.
Camera selection influences sensitivity and field of view. Many astrophotographers start with a modified DSLR or a dedicated astronomy camera with a CMOS sensor. A sensitive sensor with low read noise allows shorter individual exposures, reducing the impact of tracking errors. The field of view should comfortably frame the galaxy, which spans about three degrees across – roughly six full moons in the sky. A telescope with a focal length between 400 mm and 800 mm typically works well.
Additional equipment such as an autoguider or a field flattener can improve image quality, but neither is strictly necessary for a first attempt. Understanding the limitations of each component helps in setting realistic expectations for the data that can be acquired in a single session.
Planning the Imaging Session
Location and timing play a central role in capturing clean data. Dark skies free from light pollution give a higher signal‑to‑noise ratio for faint outer regions of the galaxy. The phase of the moon should be considered – a moonless night or a night when the moon is well below the horizon reduces skyglow. The Andromeda Galaxy is well placed in the autumn and early winter evenings for observers in the Northern Hemisphere, culminating at altitudes that minimise atmospheric extinction.
Before setting up, it is wise to check weather forecasts, wind conditions, and the predicted seeing. A clear, calm night with stable air improves the sharpness of individual frames. Preparatory tasks include balancing the telescope, focusing on a bright star, and calibrating the mount’s polar alignment. A polar scope or a plate‑solving routine can speed up this process. Establishing a consistent workflow reduces time lost during the session.
Data collection typically involves capturing multiple short exposures rather than a single long one. For small telescopes, exposure lengths of 60 to 180 seconds per frame are common, depending on sky brightness and mount tracking performance. A total integration time of two to four hours produces a noticeable improvement in detail and noise reduction, but even one hour of good data can reveal the galaxy’s main features.
Exposure Settings and Calibration Frames
Selecting appropriate camera settings depends on the sensor’s characteristics and the target’s brightness. For a DSLR, an ISO setting between 800 and 1600 often balances dynamic range and read noise, but the exact value can be tested using the camera’s histogram. The exposure length should be short enough to avoid saturating the bright core while still capturing faint outer regions. A common approach is to set the exposure so that the peak of the histogram lies about one‑third from the left edge.
Many practitioners use the “sub‑exposure” approach: collecting many frames (called light frames) and later combining them. Alongside light frames, calibration frames are essential for correcting sensor imperfections and optical artefacts. Dark frames, taken with the same exposure length and temperature but with the lens cap on, map hot pixels and fixed pattern noise. Flat frames, taken with uniform illumination, correct vignetting and dust shadows. Bias frames capture the camera’s baseline readout and can be used to process darks more efficiently.
The number of calibration frames should be sufficient to reduce noise in the master frames. A typical recommendation is at least 15–20 darks, 20–30 flats, and 30–50 bias frames. These are then combined into master files and applied during stacking. The process is systematic and, while it adds time to the session, it significantly improves the final image’s uniformity.
Stacking and Initial Data Processing
After the imaging session, the raw data is transferred to a computer for stacking. Software such as DeepSkyStacker, Siril, or AstroPixelProcessor can align and combine the light frames, applying the master calibration files in the correct order. The stacking algorithm (e.g., median, sigma‑clipped average) rejects outliers like satellite trails or cosmic ray hits. The result is a single integrated image with enhanced signal and reduced random noise.
The stacked image is typically a 16‑bit FITS or TIFF file that appears very dark on screen because the data is still linear. Stretching the histogram is required to bring out the galaxy’s details. Linear stretching, often performed in the stacking software or a dedicated tool like Photoshop or GIMP, transforms the image’s brightness distribution. Care must be taken to avoid clipping the black point or saturating the core. A common method is to apply a gentle stretch using a curve or histogram transformation, then evaluate the result and repeat if needed.
Colour calibration follows the stretch. For a one‑shot colour camera (DSLR or OSC), white balance can be set using a region of background sky, or by applying a colour correction matrix if known. The goal is to produce a natural colour rendition where the galaxy’s dust lanes appear reddish and the spiral arms show a bluish tint from young stars. Over‑saturation should be avoided because it can mask subtle structures.
Fine‑Tuning Detail and Noise Management
Once the image is stretched and colour‑balanced, further processing can enhance visibility of the galaxy’s features. Techniques such as unsharp masking, deconvolution, or multi‑scale processing (e.g., in PixInsight or Photoshop) can sharpen fine details without amplifying noise excessively. It is important to apply sharpening selectively, perhaps using a mask to protect the bright core from becoming too harsh.
Noise reduction is a balancing act. Aggressive noise reduction can blur the galaxy’s delicate outer spiral arms. Many astrophotographers prefer to apply noise reduction sparingly, often targeting only the background sky. Software tools offer wavelet‑based or median‑based filters that can reduce grain while preserving edges. Experimentation with different settings and previews helps find a suitable compromise.
Finally, the image can be cropped to remove stacking artefacts at the edges, and the background sky can be graded to a uniform tone. A subtle gradient removal tool, often found in astrophotography software, can correct uneven illumination left from imperfect flat frames or light pollution. The entire processing workflow should be documented, allowing the practitioner to replicate or adjust it in future sessions.
The resulting image of the Andromeda Galaxy, captured with a small telescope, can reveal structures that are invisible to the naked eye. While it may not rival professional images, it represents a personal achievement that reflects careful planning, methodical data acquisition, and thoughtful post‑processing. Each session provides opportunities to refine techniques and deepen understanding of the craft.